
Hello! Welcome everyone to this tutorial where I will take an image I created on the mage.space website and then explain and detail the tools and techniques I used for its creation.
Model choice
An important step is the choice of the creation model. Here, I selected the « Aniverse » model. It often provides a very precise and clean rendering, adapting well to various possible settings. This model generally induces minimal distortions, reducing the need for negative prompts.
The prompt
After selecting the model, the next step, of course, is writing the prompt. Most of the time, I start with a text I write describing a person, a situation, a place, and occasionally the atmosphere along with quality adjectives.
Next, I simplify by removing complete sentences, retaining only the essential fragments. This process allows my imagination during text writing to generate more ideas for the image, and then I preserve the crucial information. It helps maintain a stable workflow by avoiding unnecessary additional information that could disrupt the creative process.
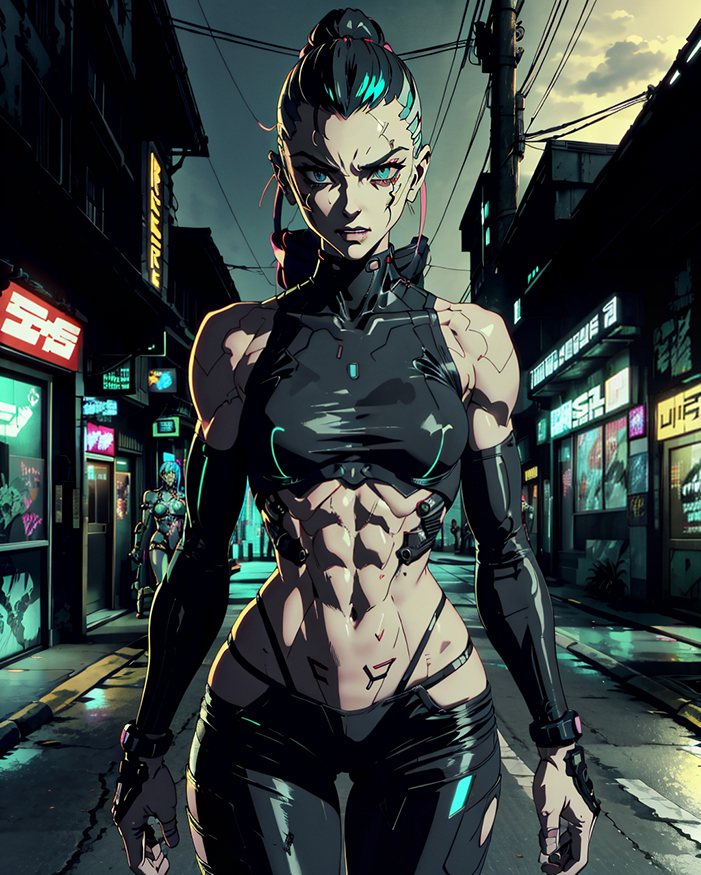
Here, the prompt was : « 1girl,sexy,small breasts,perky breasts,slim tight body,ripped muscles,muscular body, in a cyberpunk street, ambiance at night, angry attitude, fighting attitude,aggressive,cyberpunk ambiance,cyberpunk art style »
LoRas choice
Once this is done and tests are conducted to assess the viability of the prompt, I proceed to complete the creation by selecting LoRas to refine the rendering and details of the image.
Here, the LoRas were : « CyberpunkAI_v1.0 », and « cyberpunk_edgerunners_offset »
I recommend using LoRas that align with the quality adjectives used in the prompt. This strengthens their effects and prevents strange distortions and creations.
Textual Inversions choice
Next comes the moment to choose the Textual Inversions to use. This is not always necessary, but when our idea does not materialize as desired, they can help improve the output. Typically, I use a Textual Inversion that complements the negative prompts. This approach reduces conflicts in generation, and artifacts and distortions are almost nonexistent.
Here, the Textual Inversion was : « ti:FastNegativeV2 »
The negative prompt
To further refine the image, the use of a negative prompt is often crucial. It’s essential not to add too many to give the AI room to create diverse images and avoid excessive similarity unless, of course, that is your goal. In this case, I utilized the negative prompt directly suggested by the Mage.space website.
Here the standard negative prompt was : « (painting by bad-artist-anime:0.9), (painting by bad-artist:0.9), watermark, text, error, blurry, jpeg artifacts, cropped, worst quality, low quality, normal quality, jpeg artifacts, (signature), watermark, username, artist name, (worst quality, low quality:1.2), bad anatomy »
Rendering settings
After the purely creative process, it’s time to configure the image generation. At this stage, I set the format to portrait 3:4, a standard format commonly used in photography and easily compatible with Instagram.
Next, you need to choose the number of rendering steps. I always set it to the maximum of 100; the rendering on mage.space remains very fast for such a high level of quality, so it’s worth taking advantage of! This will only make the image more beautiful and detailed.
Another important process is the rigor of the prompt. The higher you set this adjustment, the more you force the AI to strictly adhere to the prompt. Conversely, the lower you set it, the more freedom you give the AI for rendering. Here, I chose a perfectly moderate setting; I wanted my prompt to be accurately rendered but didn’t want to overly constrain the generation. In some cases, setting it too high can result in many rendering artifacts that are not always easy to correct.
The Scheduler
The scheduler, despite its obscure term, is essentially the algorithm that customizes how the AI compiles the final image. After multiple trials, especially for images in animated, manga, or drawing styles, I recommend the « dpm_sde_karras » scheduler. Using this, I achieve an image with almost no visible noise, minimal color artifacts, and pixelation.
The enhancer
The rendering enhancement, also referred to as the « Enhancer, » is an image upscaling algorithm. Mage.space allows the addition of a function called « HiRes. »
Behind these strange terms are two straightforward and highly qualitative functions! The upscale, in a simple sense, enhances the image resolution and increases its size without a loss of visual quality.
The HiRes function is more advanced, and its impact is enormous. By activating it, a kind of second generation is initiated, starting from the rendered image. It creates a significant amount of additional details. Many distortions, artifacts, and other errors disappear, making room for detailed and incredible images.
I always set this option to the maximum; the time spent is well worth the outcome! Given the style of the images I create, I use the « upscale anime » version offered by Mage.space to achieve impeccable results.
In the end
In the end, this process may seem lengthy, but once you reach your goal, it’s just a matter of generating multiple images to suit your taste.
I hope this tutorial will be your ultimate guide to bringing your ideas and imagination to life!
I invite you to check regularly for my creations, subscribe to the Instagram account, and share the website and this page as much as possible!
Thank you for your support, and see you soon!